


 Deutsch
Blog / Tips
How to Make a Bamboo Bed
Jun
DIY tutorial
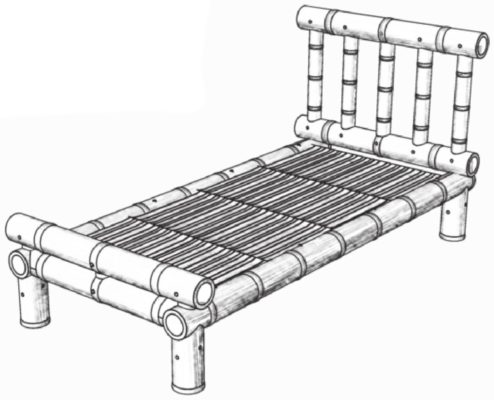
In this DIY tutorial, we show you how to make a bamboo bed using very basic hand tools and without any metal fasteners or screws.
Materials list
Step 1: Drilling double holes in the bamboo bed frame rails
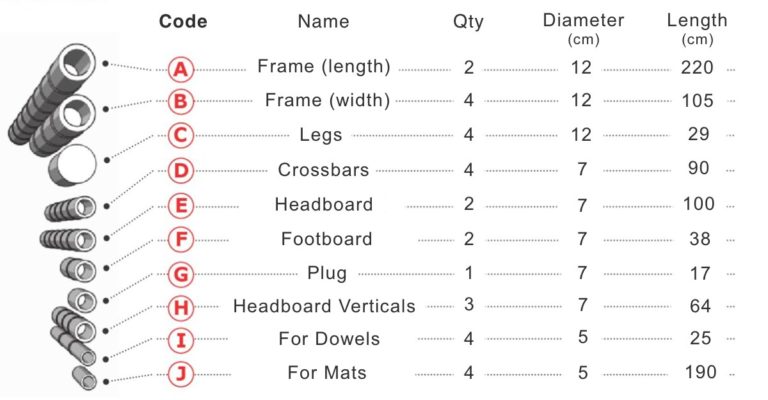
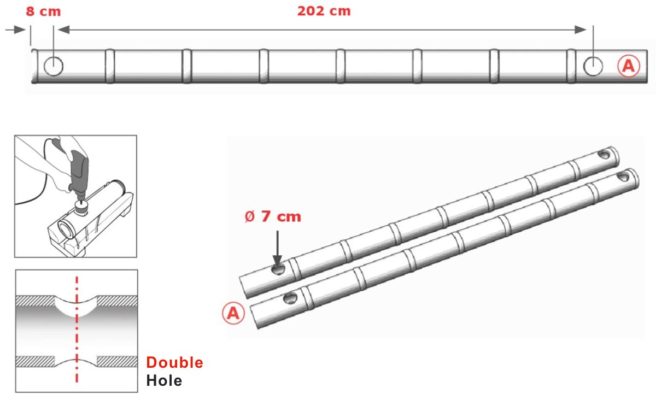
Cut two bamboo canes to a length of 220 cm (the tip of the pole should include a node). Then drill two double holes in each bamboo bed frame rail(A) . The first hole should be made 8 cm from the tip of the bamboo cane, and the second hole 202 cm from the first. The holes should be 7 cm in diameter.
Step 2: Drilling single side holes in the bamboo bed frame rails
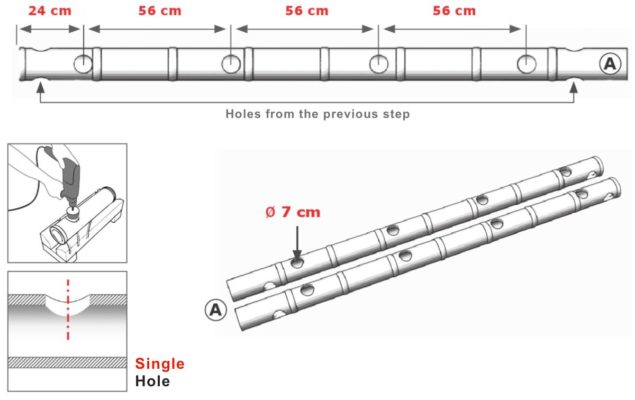
Turn the bamboo canes(A) 90° and drill 4 single holes (not penetrating both sides of the cane). Drill the first hole 24 cm from the tip of the cane (the end with the node), and the second hole 56 cm from the first. All holes should be 7 cm in diameter.
Step 3: Cutting a fishmouth joint in section B1
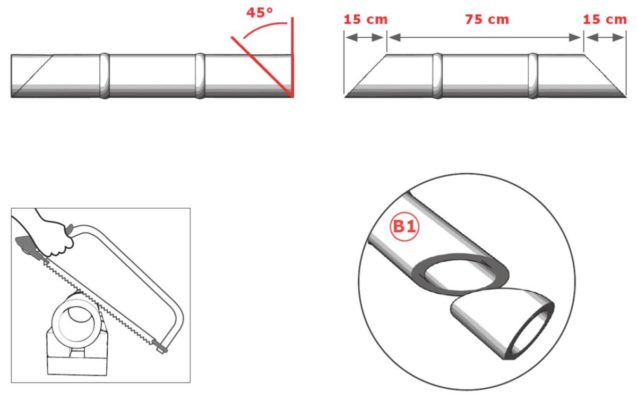
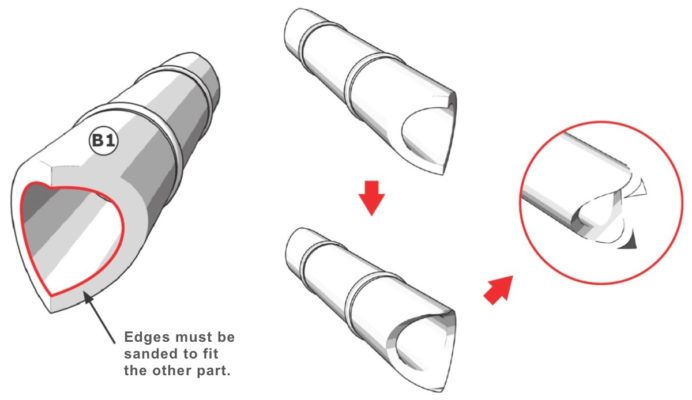
The first cut is made at a 45° angle, starting at the end of the pole(B1) . This cut should be made at both ends of the bamboo.
Step 4: Cutting a fishmouth joint in section B1
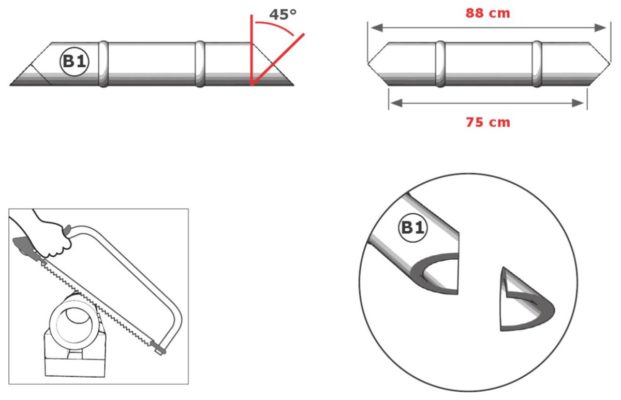
The second cut is also made at 45°, using the previous cut as a reference point.
Step 5: Cutting a fishmouth joint in section B1
Finally, the inner edges of the fishmouth joint should be sanded or carved out, and the tips rounded off. This is to create a better fit at the joint of the bamboo bed frame.
Step 6: Drilling a single hole in section B1
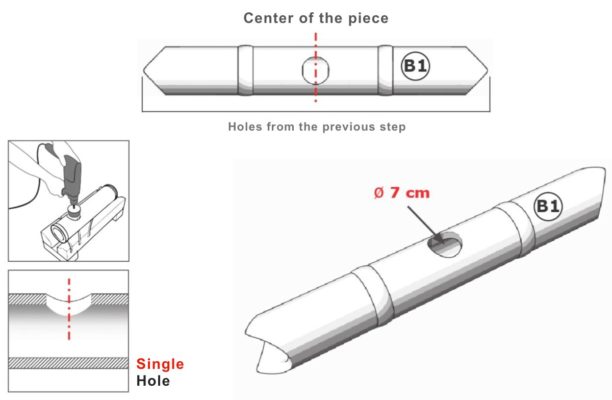
Drill a single hole with a diameter of 7 cm in the middle of the longest side of the bamboo cane(B1) .
Step 7: Drilling double holes in section B2
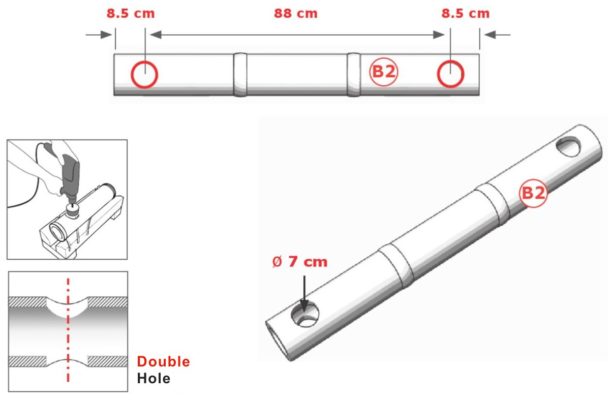
Drill two double holes at both ends of the bamboo cane(B2) . These double holes should be drilled 8.5 cm from the ends of the pole, with a diameter of 7 cm.
Step 8: Drilling single holes in section B2
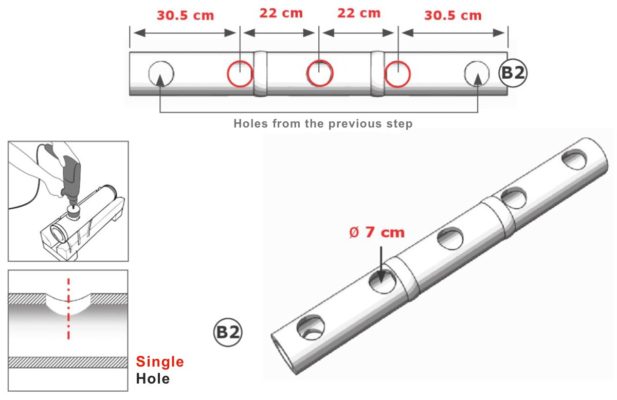
Drill 3 single holes in(B2) the cane. The first and last hole 30.5 cm from the end of the bamboo cane, and the one in the middle, which should be 22 cm from the others.
Step 9: Positioning the crossbars
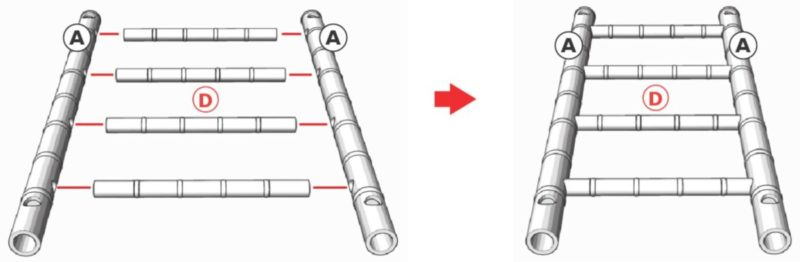
Place the 4 bamboo crossbars(D) in the holes previously made in the bed frame rails(A) .
Step 10: Mounting the headboard on the bamboo bed
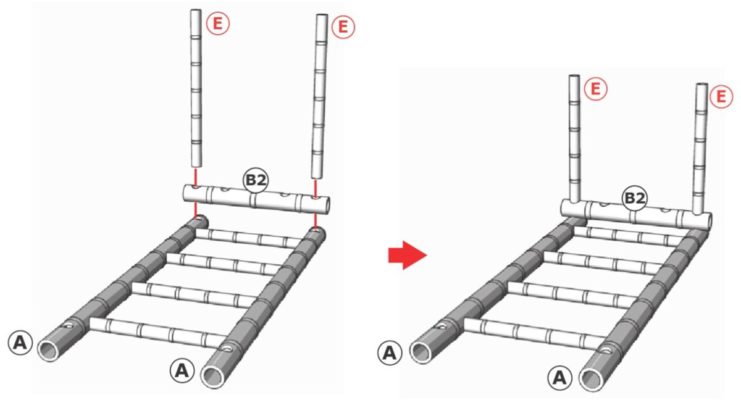
Insert the two headboard poles(E) simultaneously into(B2) and into the bed frame rails(A) as shown in the figure below.
Step 11: Mounting the footboard section of the bamboo bed
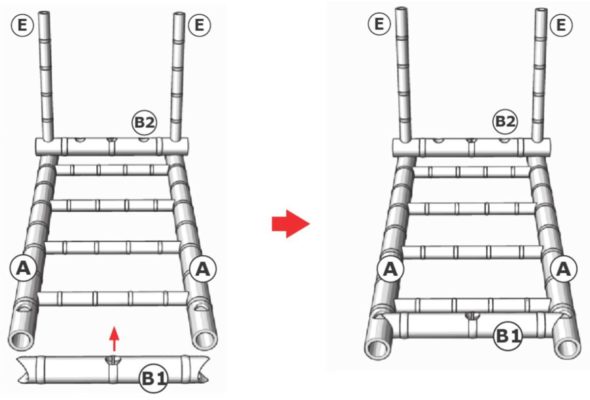
The section with fishmouth cuts at the ends(B1) is fitted at the other end of the bed frame rails(A) ; i.e., the foot end of the bed.
Step 12: Positioning the leg support
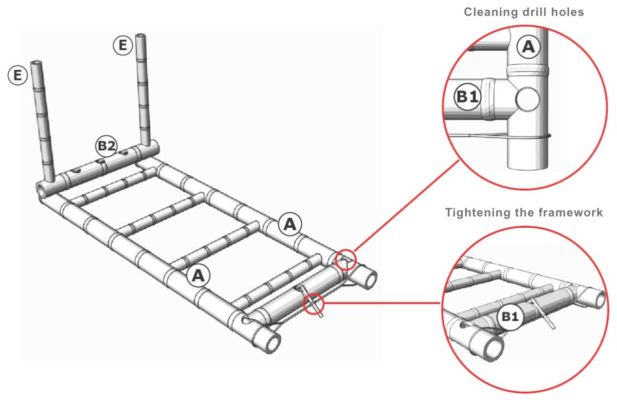
The(B1) part should fit tightly between the bed frame rail sections(A) . To hold the bamboo bed frame in place, it’s recommended to tighten the bamboo piece using rope and a peg. This way, you can increase the tension until the piece fits perfectly. At this point, you can also trim away the excess material from the fishmouth joint that partially overlaps the hole in the bed frame rail.
Step 13: Making bamboo pegs
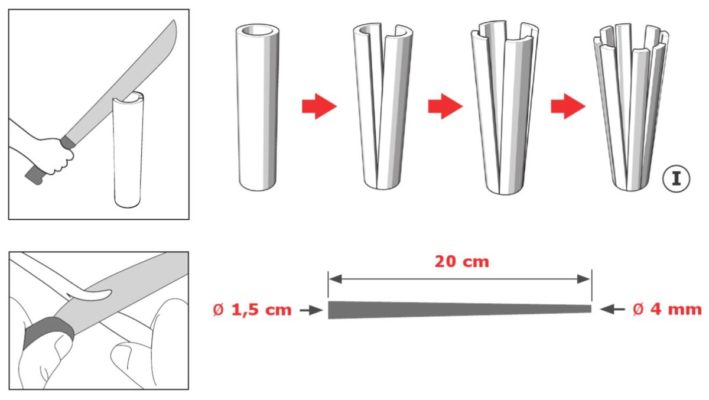
To secure all parts of the bamboo bed, we need to make and use bamboo pegs. Take a piece of bamboo(I) and split the bamboo cylinder along the grain into 8 equal-sized pieces using a machete. These pieces are used to make 20 cm long dowels, with a diameter of 1.5 cm at one end and 4 mm at the other.
It’s important that the bamboo pegs have atapered shape , so they can be driven in and used to secure the bamboo bed components easily. Also, let theouter layer ofbamboosit tightly on one side of the peg, since this 1 mm layerholds 90% of the strength of the bamboo peg. For this bed design, you’ll need at least 20 dowels.
Step 14: Drilling holes in the bamboo bed frame
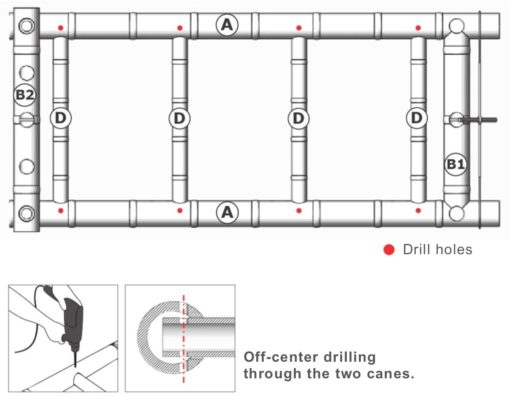
Make 8 holes with a diameter of approx. 8 mm in the bed frame rails(A) . It’s recommended to secure the 4 crossbars(D) on one side first, before drilling the holes on the other side of the bed. Without securing one side, the corresponding holes could shift position when drilling the holes on the other side.
Step 15: Securing the bamboo pegs in the bed frame
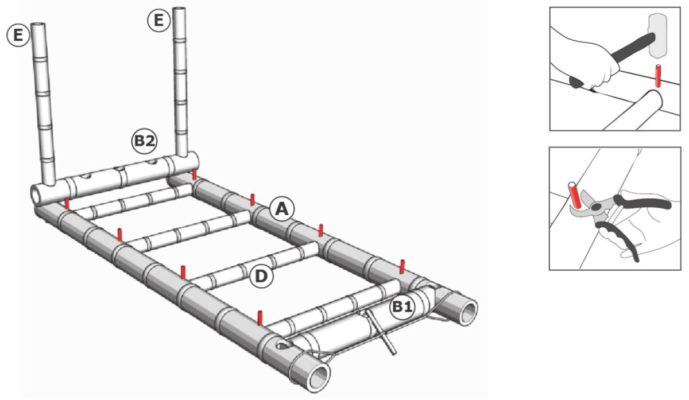
The bamboo pegs are hammered in until they come out the other end of the hole. Once the bamboo pegs are secured, you can cut off the excess. Some bamboo furniture manufacturers use a drop of wood glue before inserting the bamboo pegs, but this isnot necessary to guarantee a strong fixation of the peg.
Step 16: Making fishmouth cuts in the legs
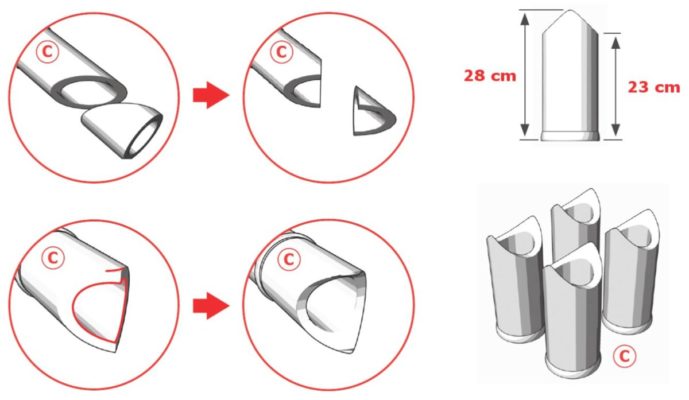
Carry out the same process as described in steps 3, 4, and 5, with the only difference being that only one side should have a fishmouth cut, while the other end has a node. The resulting legs should measure 28 cm at the highest end and 23 cm at the lowest.
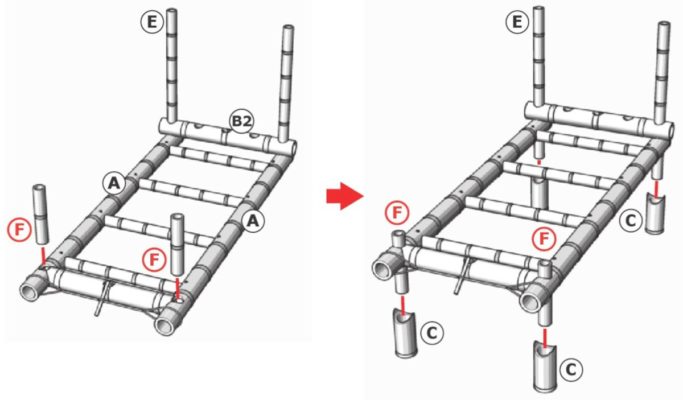
Step 17: Positioning the legs
The(F) parts are used as the front support, corresponding to the(E) parts that form the headboard. Both are also used as posts that fit into the legs. The legs are(C) then placed under the frame.
Step 18: Securing the legs
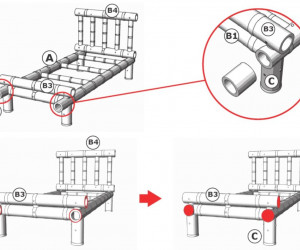
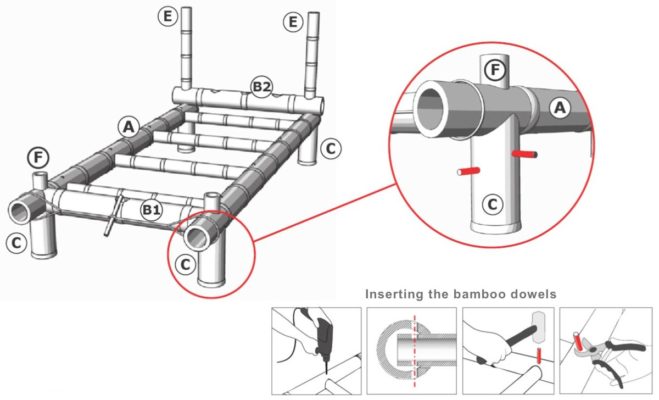
The legs are secured with dowel pins, as shown in the illustration below. The dowel holes are approximately 8 mm in diameter.
Step 19: Making holes in the footboard frame section B3
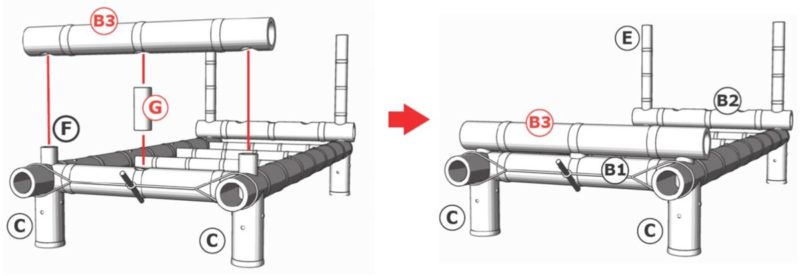
3 single holes with a diameter of 7 cm need to be made in the base plate(B3) . The first and last holes are 8.5 cm from the respective end; the second hole is in the middle of the piece, which should be 44 cm from the others.

Step 20: Positioning the footboard frame section B3
A bamboo peg(G) is placed in the middle of(B1), after which(B3) is placed on top. The bamboo peg helps reinforce the bamboo frame.
Step 21: Positioning the footboard dowels
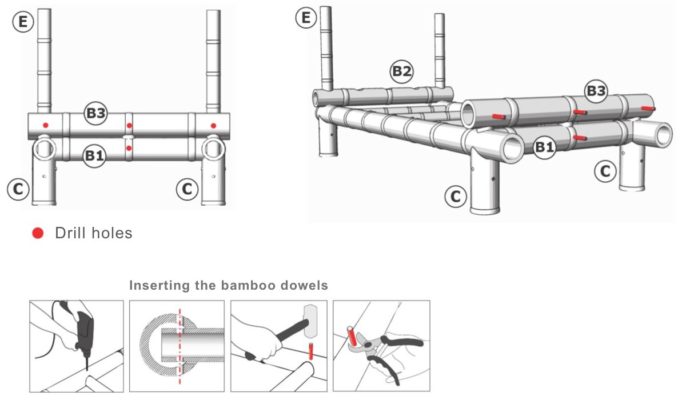
Drill 4 holes with a diameter of approx. 8 mm in the footboard as shown in the figure. Insert and tighten the dowels, then cut off the excess.
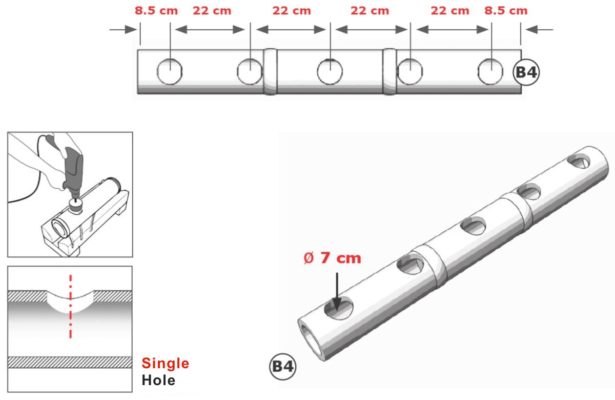
Step 22: Making holes in the headboard section B4
Drill 5 single holes with a diameter of 7 cm in the headboard(B4) . The first and last holes are 8.5 cm from the respective end, the other 3 holes at a spacing of 22 cm.
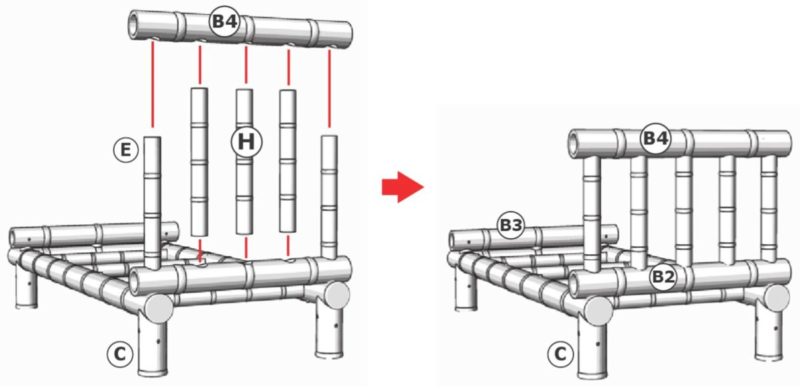
Step 23: Positioning the headboard
Insert the 3 headboard posts(H) i (B2), and place(B4) on top of them.
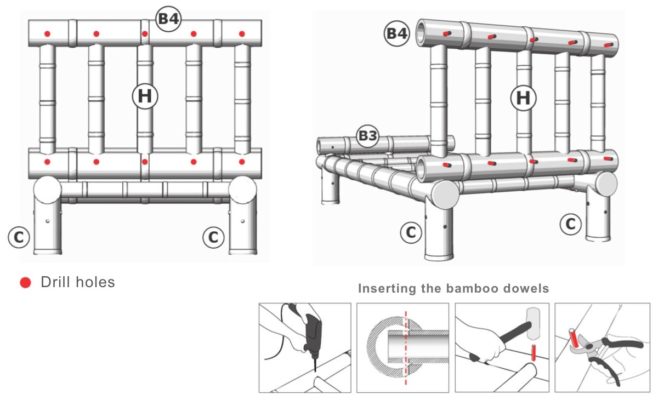
Step 24: Positioning the headboard dowels
Drill 10 holes with a diameter of approx. 8 mm in the headboard as shown in the figure. Insert and tighten the dowels, then cut off the excess.
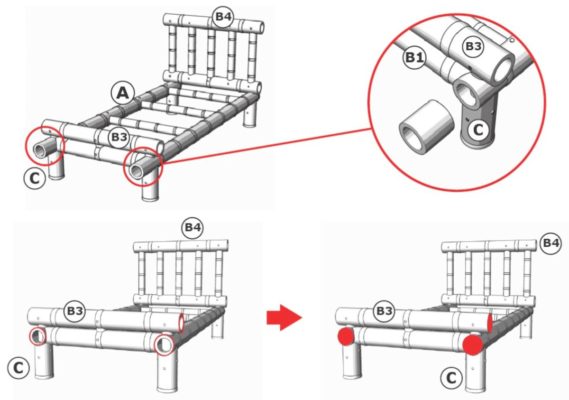
Step 25: Trimming the bed frame and covering the ends
Cut off the excess material from the bed frame rails(A), and cover the open bamboo canes with a piece of wood or plywood (alternatively, you can insert a bamboo node into the cane for a more natural look). Trace the outline of the bamboo cane directly onto the plywood before cutting out the circle with a jigsaw. Glue the plywood to the bamboo with wood glue.
Step 26: Making a bamboo mat
Carry out this process for the 3 bamboo canes(J) . Alternatively, you can also usesplit bamboo rolls for the bed base.
 |
1. Make cuts on the outside of the nodes to reduce the resistance of the bamboo. |  |
2. Make partial, alternating cuts in the adjacent internodes, so that the bamboo canes don’t split completely. |
 |
3. Make one cut along the cane to start flattening the bamboo. |  |
4. With the semi-open bamboo cane, the node cracks open from the inside until it loses its rigidity. |
Step 27: Positioning the bamboo mats
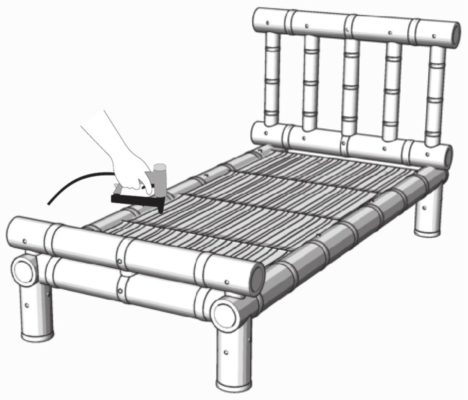
Place the bamboo mats on top of the crossbars and secure them with staples (alternatively, you can use fine wire to attach the mats to the crossbars). The inner side of the mat should face downward.
Step 28: Final dimensions of the bamboo bed
And that’s how you make a bamboo bed – now it’s your turn! Feel free to share pictures of your bamboo projects in ourBamboo Forum . We love seeing your creativity.