



 Deutsch
Blog / Tips
Bamboo Lashing Techniques
Jun
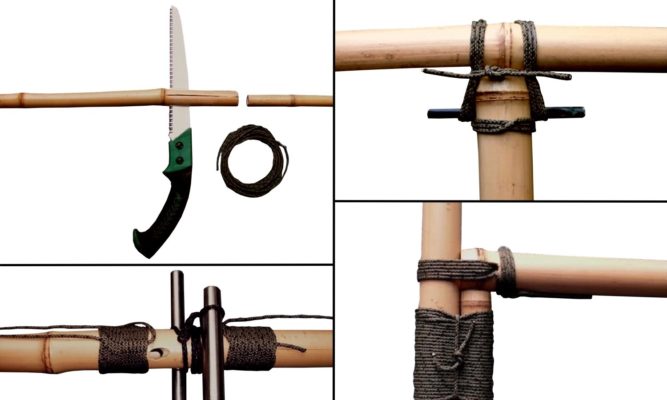
Bamboo is one of the most useful plants, as it can be used to make houses, traps, cages, furniture, tools, weapons, bridges, rafts, towers, fences, water wheels, irrigation pipes, and thousands of other objects. The challenge, however, is learning how to join these bamboo canes.
Bamboo poles can be lashed together using any of the traditional lashing knots, such as square lashing, round lashing, diagonal lashing, shear lashing, tripod lashing, floor lashing, or ladder lashing. But there are also more advanced techniques for joining or lashing bamboo poles using pegs or straps, of which we show some examples below.
Drilled Lashing Joint
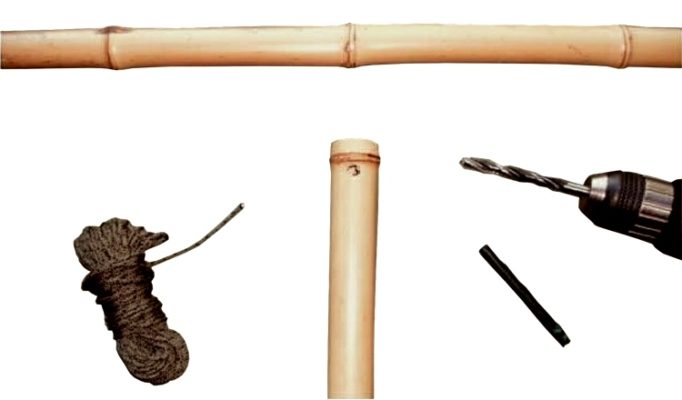
1. One of the simplest bamboo joints is the drilled lashing. A vertical pole is cut above a node, and a hole is drilled all the way through the pole, just below the node. A crossbar is then attached to the vertical pole with a lashing through the hole. For maximum strength, a node of the crossbar should be positioned at the vertical pole. Lashings on both sides of the crossbar’s node prevent the bamboo poles from shifting.
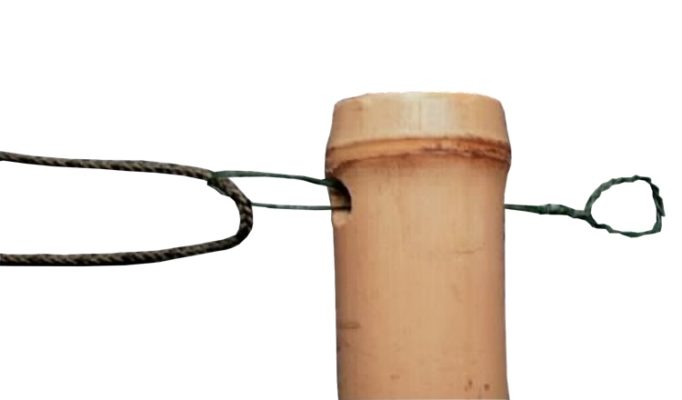
2. A piece of wire bent in half (or an improvised threading needle) makes threading through the drilled hole easier, especially the last pass or two after the hole is already packed with several wires.
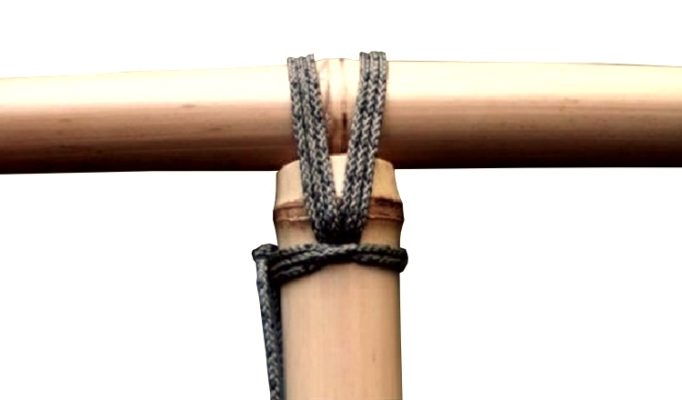
3. Here is the finished joint, showing how bamboo lashings are made on both sides of the crossbar’s node. The lashing is finished with a clove hitch around the vertical pole and a square knot. Tying lashings around any drilled hole is a good way to strengthen the joint and helps prevent the bamboo poles from splitting.
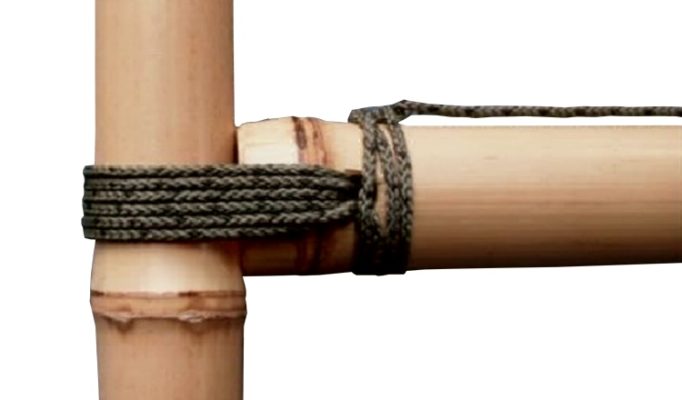
4. The drilled joint can also be used to connect the end of a crossbar to a vertical pole, as shown above. For this application, the lashings should be tied above a node on the vertical pole. Downward pressure on the crossbar will simply tighten the bamboo joint further when it meets the larger diameter of the node. This is one of the most basic principles used in bamboo construction: letting the nodes work for you to prevent slipping.
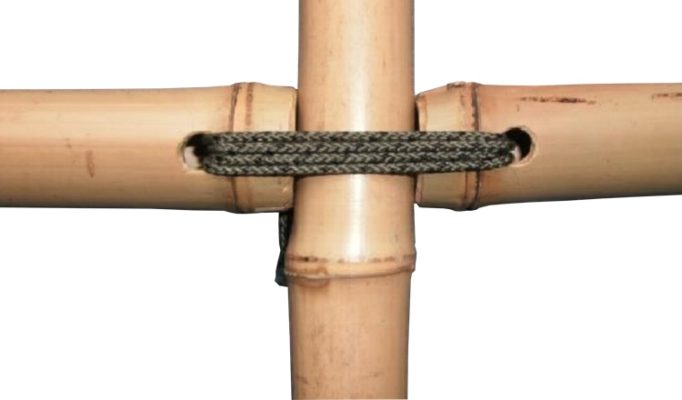
5. Drilled bamboo lashings can be used to connect more than one crossbar to an upright, which is a good way to build bamboo frames.
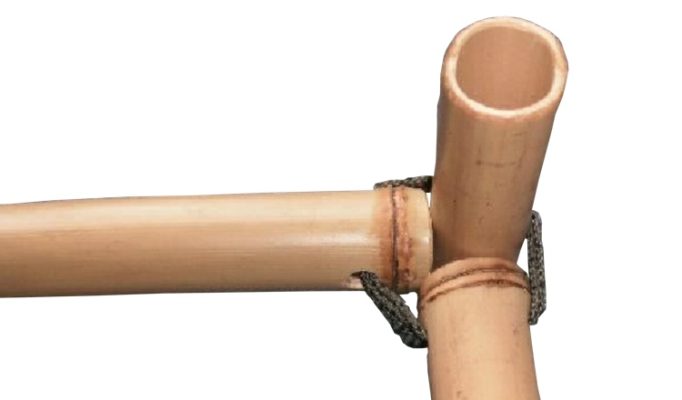
6. Using the drilled lashing, two crossbars can be connected to a vertical pole at a right angle to form a corner joint.
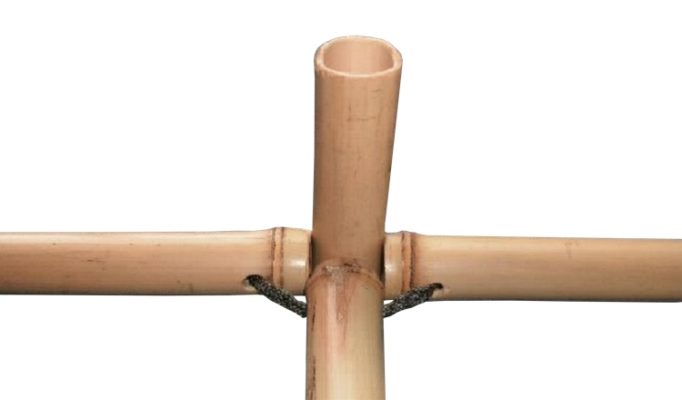
7. Drilled lashings have been used to connect three crossbars to a vertical pole, as in this example.
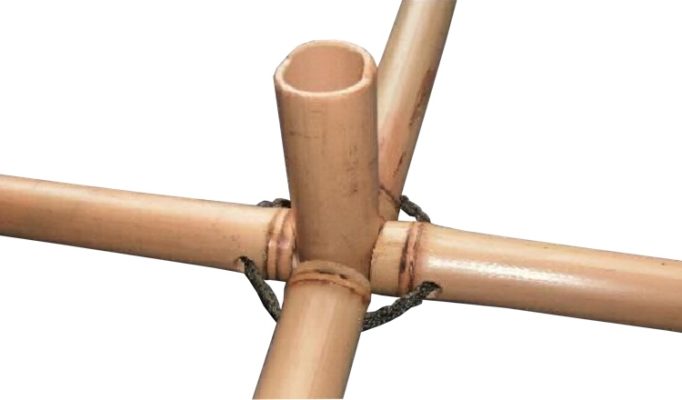
8. In this example, drilled lashings have been used to connect four crossbars to a vertical pole. Once the bamboo joint is formed and lashed in place, extra lashings can be added for reinforcement if desired.
Pegged Lashing Joint
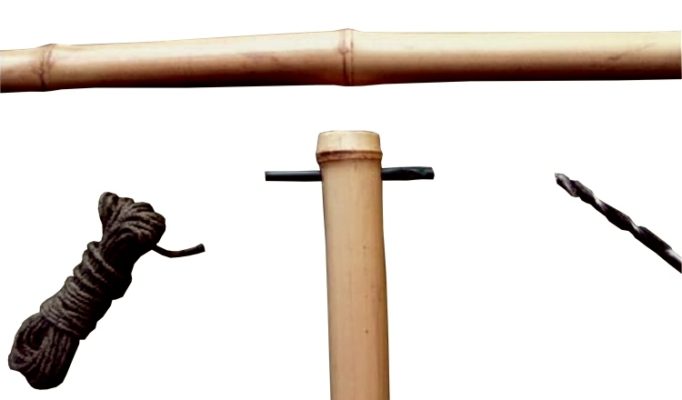
1. A variation of the drilled lashing is the pegged lashing, where a bamboo peg is inserted into the drilled hole, and the lashings are then tied around the peg instead of being threaded through the hole. The strength of this joint is limited by the strength of the peg, so use a bamboo peg with thick walls, or a hardwood peg.
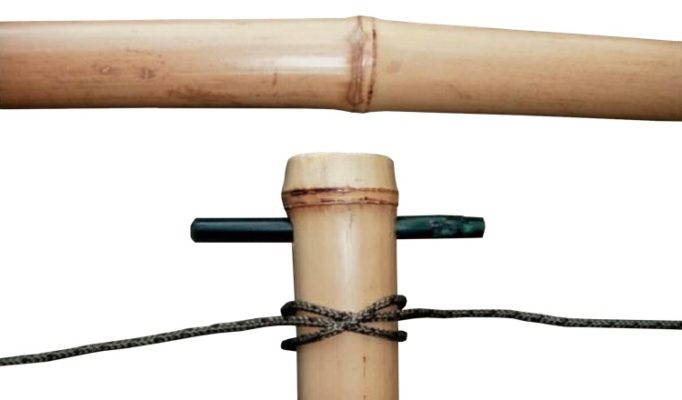
2. Start the pegged lashing by tying a clove hitch on the vertical pole below the peg.
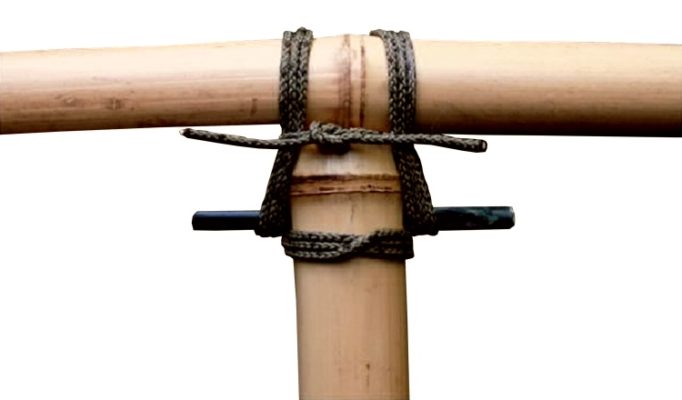
3. Lash the bamboo poles together, then add one or more frapping (tightening) turns around the lashings and finish with a square knot. The lashings can also be crossed over the crossbar, if you prefer.
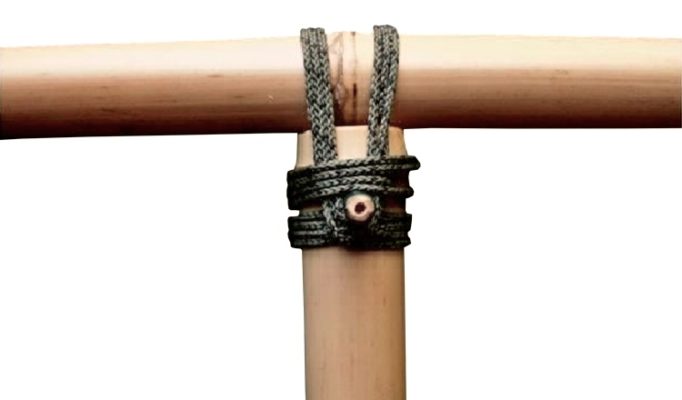
4. Another way to make lashed bamboo joints is by aligning the pole perpendicular to the crossbar, as shown here.
Diagonal Peg Lashing Joint
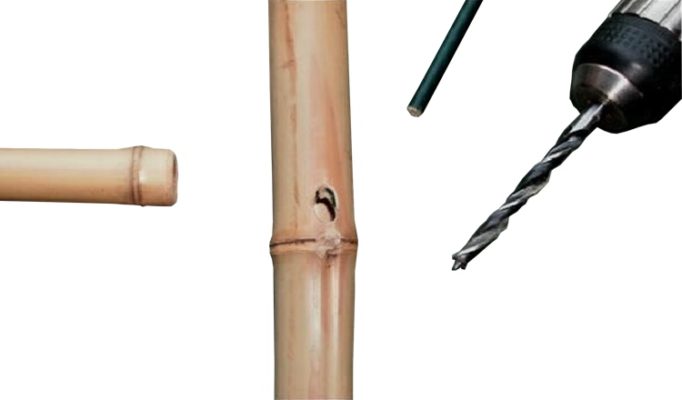
1. This bamboo joint is a diagonal peg. A hole is drilled above a node on an upright bamboo pole, so it passes through the node and comes out below the node on the other side. The exact angle can be adjusted slightly as desired.
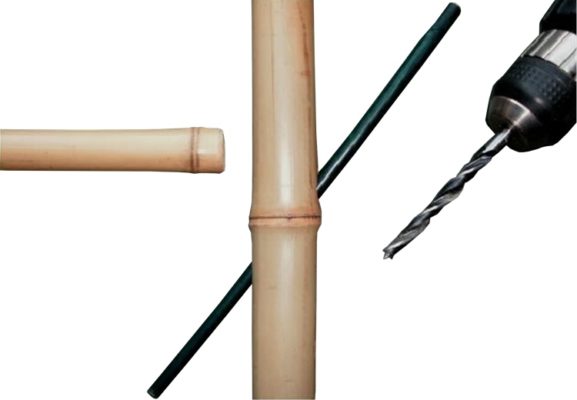
2. A long peg is inserted through the diagonal hole and will be used as support for a crossbar.
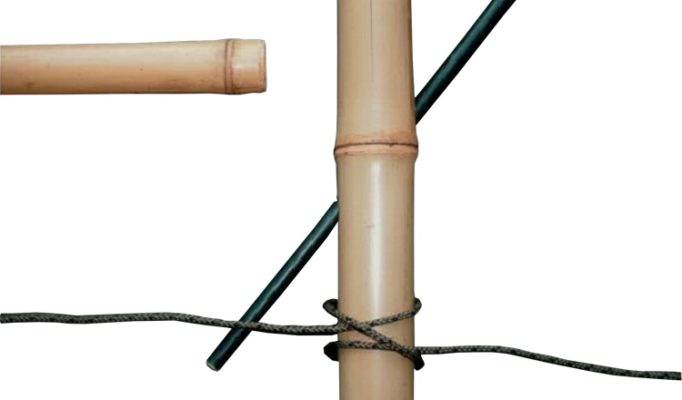
3. The lashing is done by starting with a clove hitch.
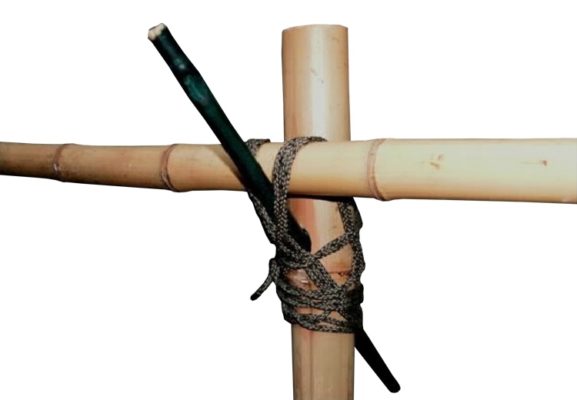
4. This bamboo lashing was made with a single wire. Separate lashings between the two main bamboo poles and around each point where the peg passes through the vertical pole could be made instead, and would likely look neater.
Pegged Socket Joint
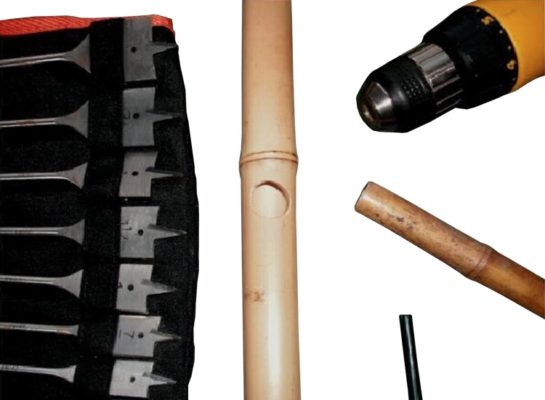
1. This joint is a pegged socket connection. A hole of the right size is drilled into an upright bamboo pole to fit a smaller crossbar.
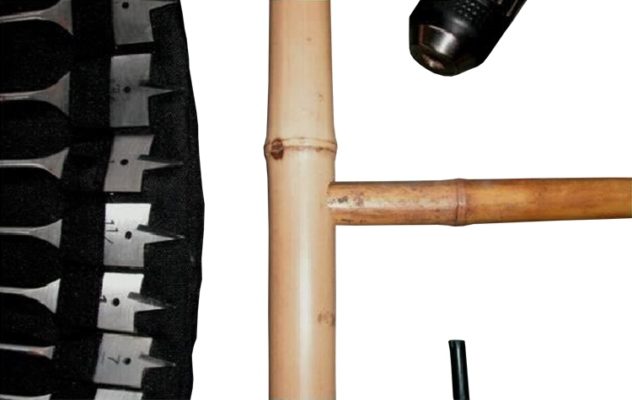
2. The crossbar is then fitted tightly into the socket until it touches the back wall of the vertical bamboo pole.
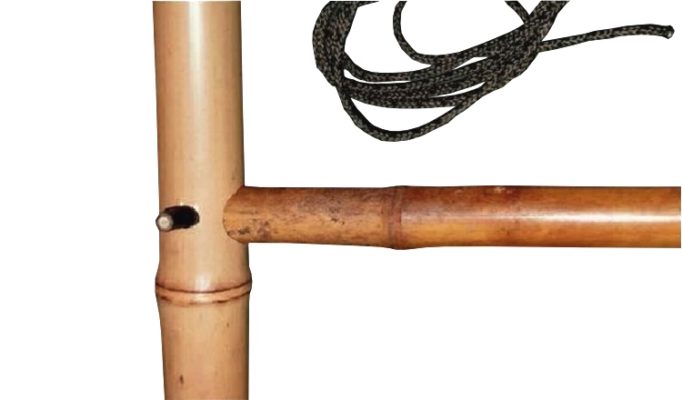
3. A hole is drilled through both pieces so that a peg can be inserted to secure the joint. This joint is often used to make bamboo ladders, using two larger poles and smaller crossbars for the rungs. Maximum strength is achieved by placing the crossbars just above the nodes on the vertical poles. The pegs can be cut flush, or left protruding to make disassembly easier.
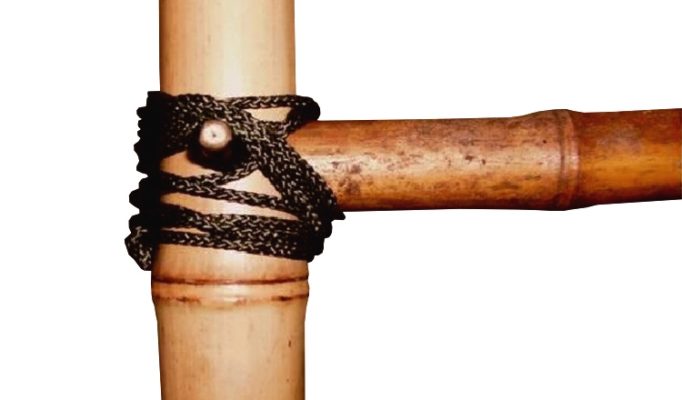
4. Lashings should be added to these bamboo joints to prevent splitting under heavy loads.
Key Joint
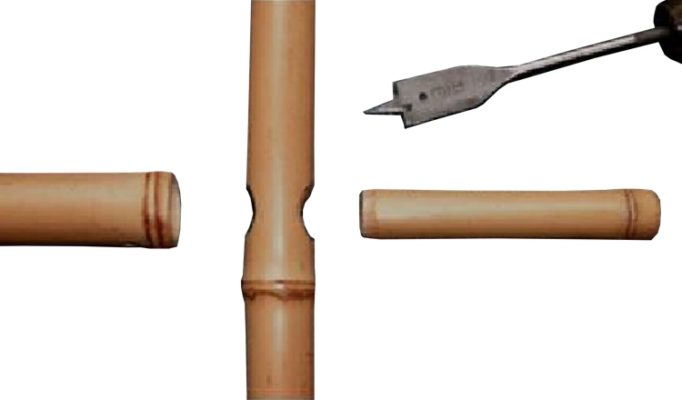
1. This joint is called a key joint. A vertical bamboo pole is drilled to allow a key element to be installed. The key supports a crossbar, and the key and crossbar are secured together with a pin.
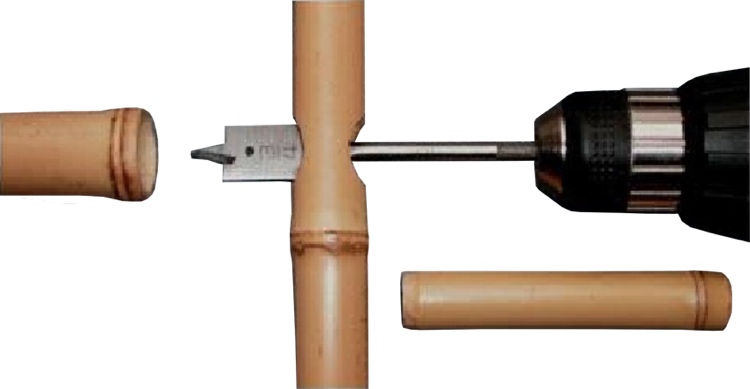
2. The hole in the crossbar is made just large enough for the body of the key to fit inside, but not large enough for the node at the end of the key to pass through.
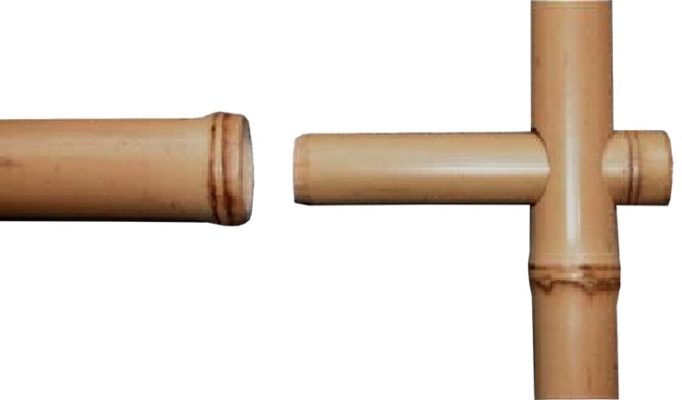
3. The key piece is installed in the hole in the vertical bamboo pole, so the node sits firmly against the side. The end of the crossbar is drilled out so the key piece can fit inside.
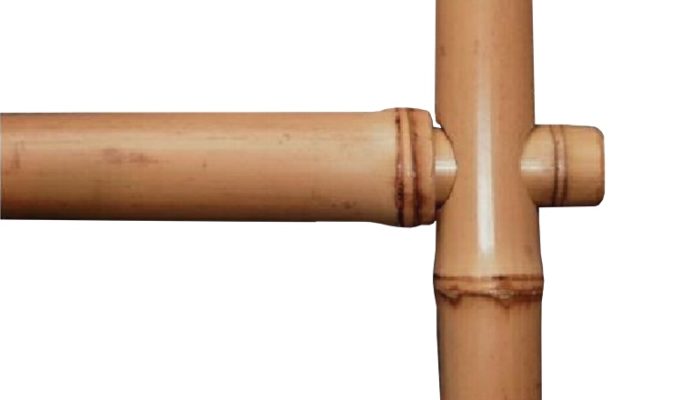
4. The crossbar is fitted onto the key piece until it comes into contact with the vertical pole..
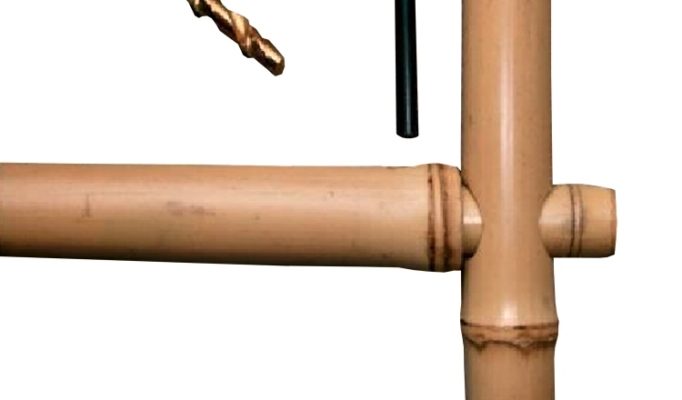
5. The crossbar and the key piece are drilled so they can be secured together.
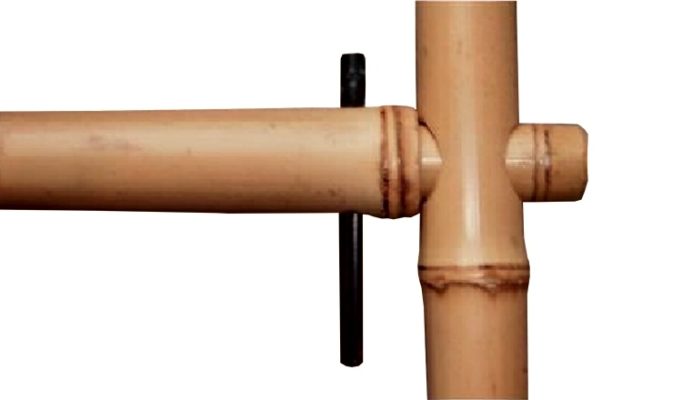
6. Finally, the pin is used to secure the finished bamboo joint, as shown here. Lashings can be added if desired. Note: A large key piece was used for this tutorial, but a smaller key would weaken the upright less.
Lashed Cross-Pole Support Joint
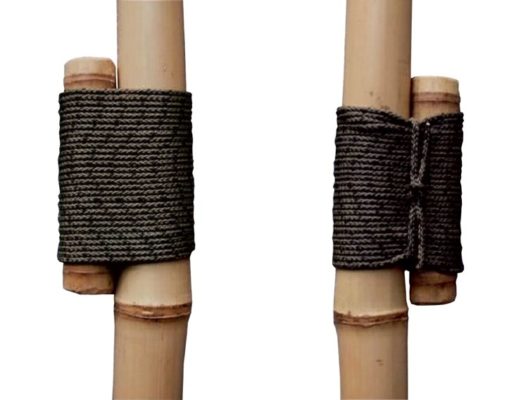
1. This joint is a lashed cross-pole support. A section of bamboo is lashed into a vertical position, as shown here. Longer supports can also be used, and these should be lashed at the top, bottom, and middle.
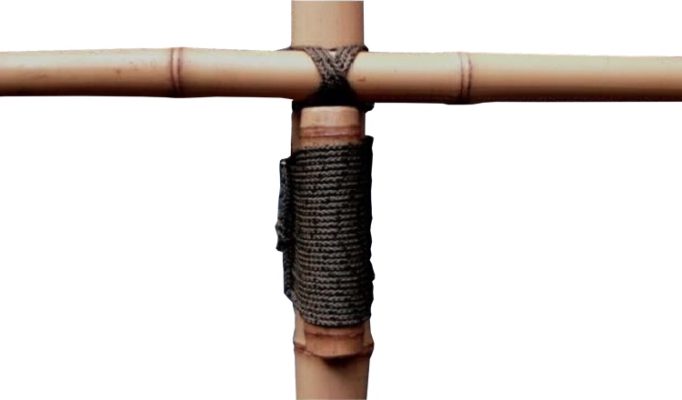
2. The cross pole is then lashed to the vertical pole above the support.
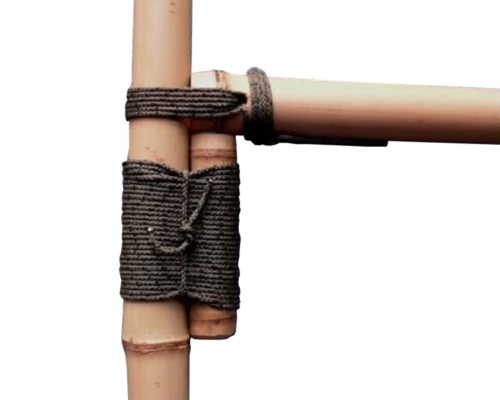
3. The lashed cross-pole support can also be combined with drilled lashing for use when the nodes aren’t in a practical position. Simply vary the length of the support to reach the nearest node below the cross pole.
Diagonal Braces
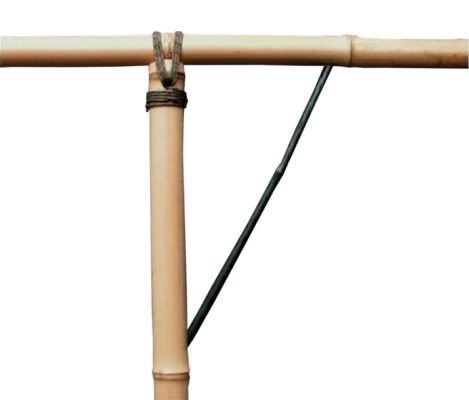
1. Diagonal braces can be added to almost any bamboo joint to provide extra stability. Notice how the brace is positioned so its ends connect at nodes for maximum structural strength. Lashings can also be added as needed.
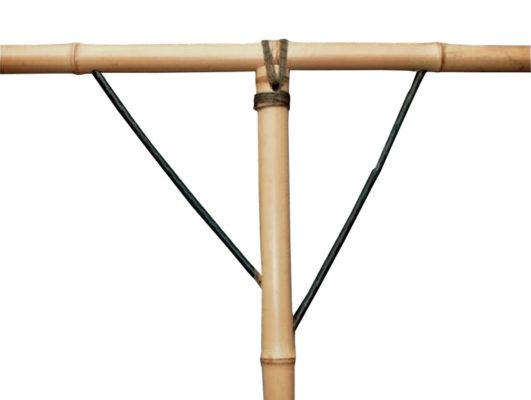
2. Two diagonal braces can also be used instead of one. Multiple holes can weaken a vertical bamboo pole if drilled in the same spot, so braces should be staggered or even attached at different nodes along the vertical pole.
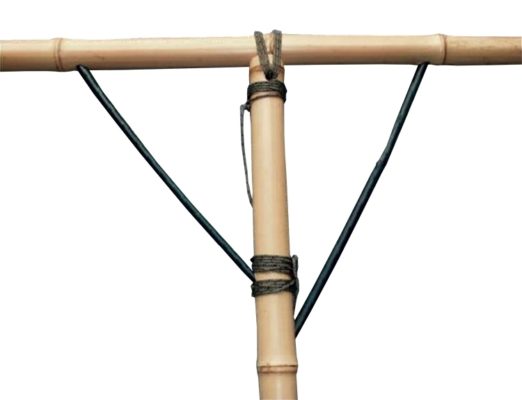
3. Lashings above and below braces that don’t end at a node are critical to protect against splitting.
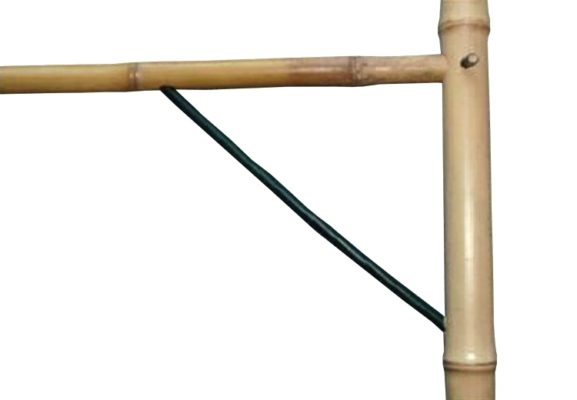
4. There can be added to any of the bamboo joints that form right angles. The ends of the diagonal braces can be fixed in place, or wrapped securely and lashed in place if desired.
Clamped Socket Joints
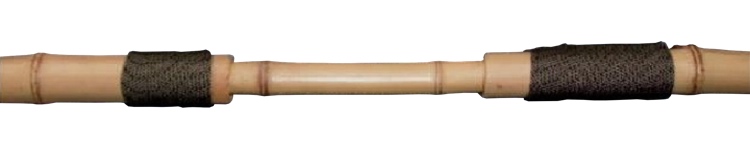
Bamboo poles of different sizes can be joined by inserting a smaller pole into a larger one. The end of the larger pole should first be lashed to prevent splitting. Socket joints like this are used to make long fishing rods or spears, and for flagpoles. Variations include fixing the smaller pole in place before lashing, cutting slits in the end of the larger pole so the ends clamp down onto the smaller pole as the lashings are tightened, and simply using a tight friction fit to hold the poles together. The friction fit works well where the item needs to be taken apart, and for holding a short foreshaft onto a spearhead or harpoon.
Bamboo water pipes are made by knocking out all the node walls with a rod that fits inside the poles, then fitting the small end of one pole into the large end of the next pole.
Two poles can be joined using a smaller internal pole to make a splice. The innermost pole can be left visible, or the two larger poles can meet with the inner pole hidden inside. The ends can be fixed or clamped in place.
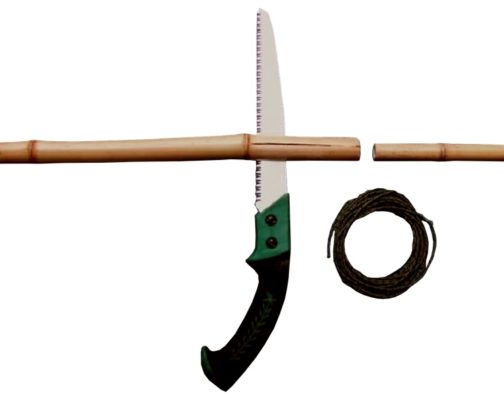
1. To make a clamped joint, saw or split the larger bamboo pole down to the first node twice, creating four sections. Note: adding a lashing to the pole on the other side of the first node prevents the splits from running too far.
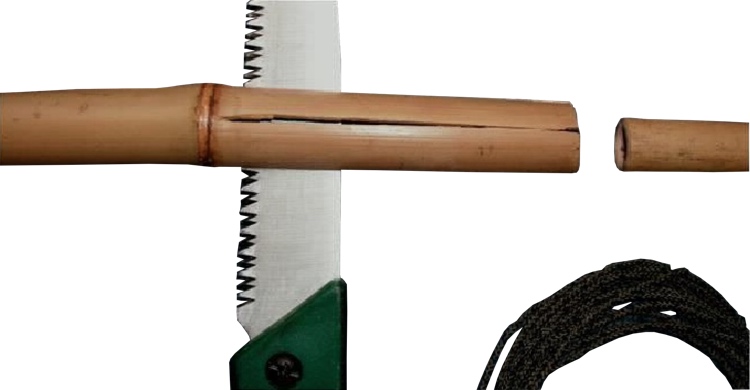
2. Enough material must be removed at the saw cuts (or splits) to let the sections clamp firmly onto the inner bamboo pole.
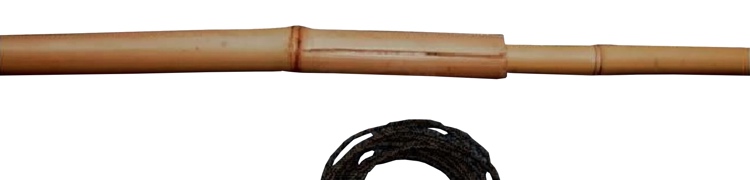
3. The smaller bamboo pole is inserted into the larger pole until it reaches the node.
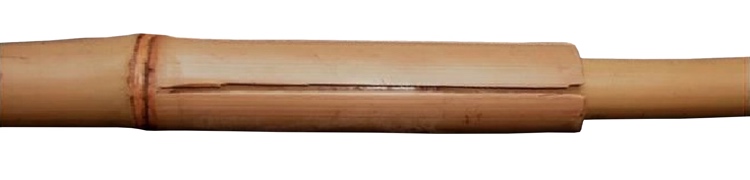
4. Check that enough material has been removed from the sections so they can clamp firmly onto the inner pole, before adding any lashings — do this by squeezing the ends by hand and removing more material as needed.
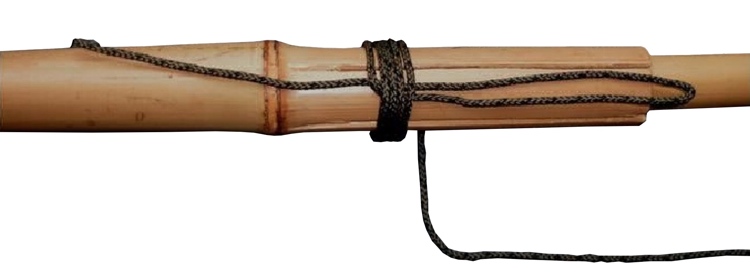
5. Start the bamboo lashing at the node end as shown, and wrap the cord over a long loop of the wire.
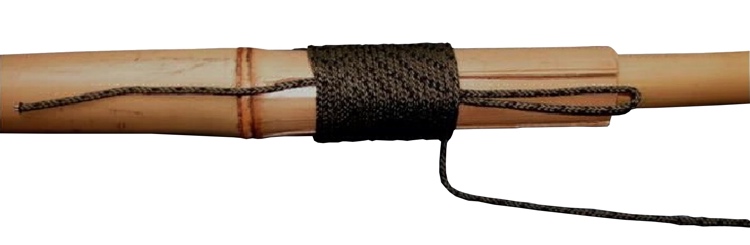
6. Pull the end of the loop after making several tight turns to tighten the first wire.
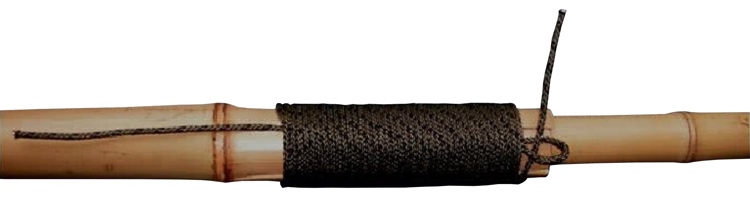
7. Keep adding turns, keeping the wire neat and tight, then put the end of the wire through the loop.
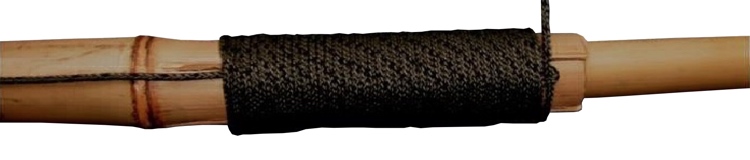
8. Pull the beginning of the wire to draw the loop tight against the lashing turns.
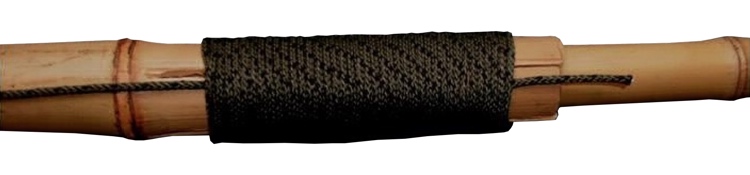
9. Keep pulling, and the loop will be drawn under the bamboo lashing, taking the end of the wire with it.

10. Finish the lashing by trimming the ends of the wire, or leave some showing to make it easy to loosen later.
Through Joint
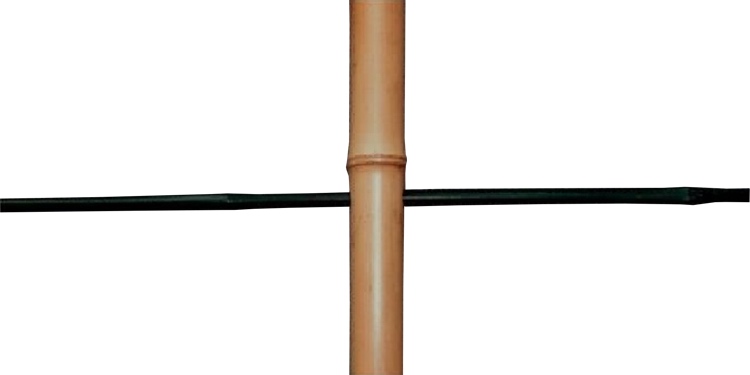
1. Another simple bamboo joint is the through joint. A hole is drilled through an upright post so a smaller cross pole can pass all the way through. It is then lashed securely, both to tighten the joint and to prevent splitting.
These joints are often used when making bamboo fence panels or rafts by feeding a bamboo pole through a line of holes made in the bamboo poles.
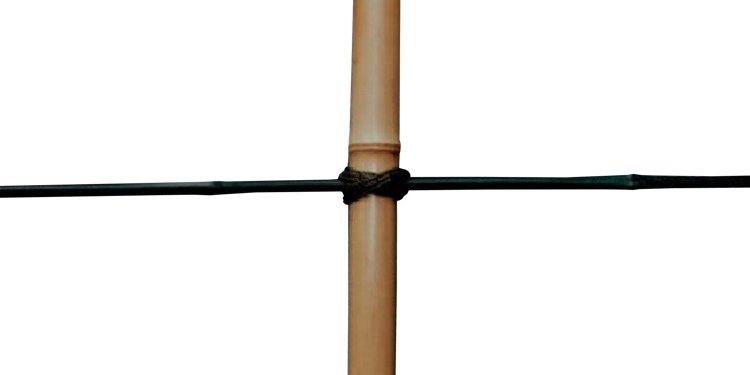
2. The holes in the upright must be made large enough to let the nodes on the cross pole pass through (unless the nodes are first sanded down), so bamboo lashing is needed to secure the joint, which would otherwise be quite loose. A good way to stop the cross pole from shifting left or right is to add a peg to this joint to fix the poles in place.
How to Repair Split Bamboo
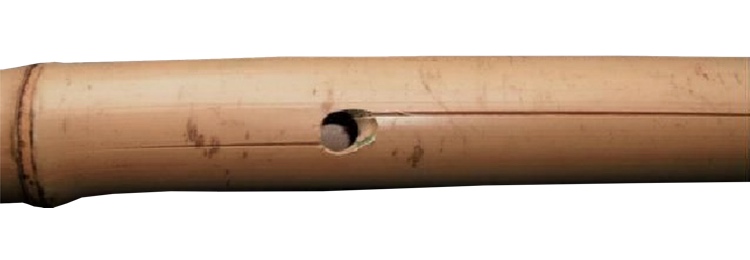
When bamboo poles have cracked, or if they split while you’re drilling a hole, you can fix it with a simple split-closing tool.
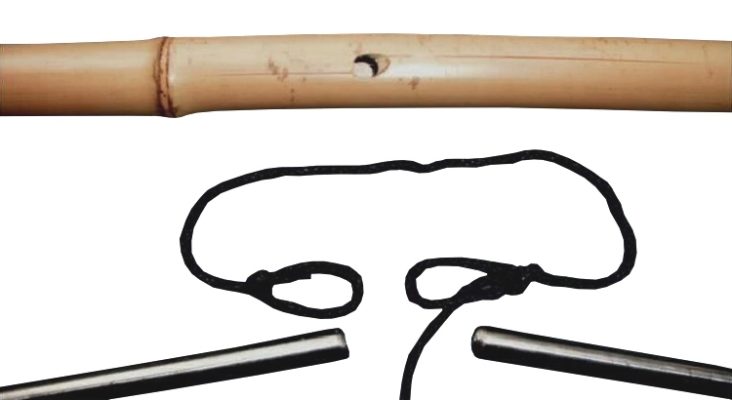
1. The split-closing tool is made from two handles and a short length of lashing cord. Tie a bowline in each end of the rope.
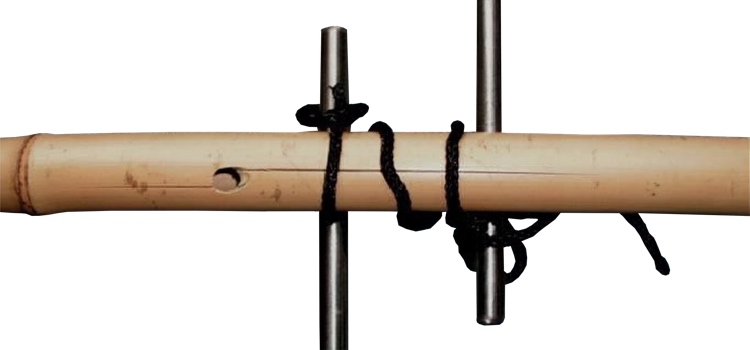
2. Slip one bowline loop over the end of one handle, then lay the bamboo across the grip. Wrap the rope around the bamboo over the split area (two or three times), then slip the other bowline loop over the end of the second handle as shown above. The exact length of the rope can be adjusted by re-tying the second bowline loop if needed.
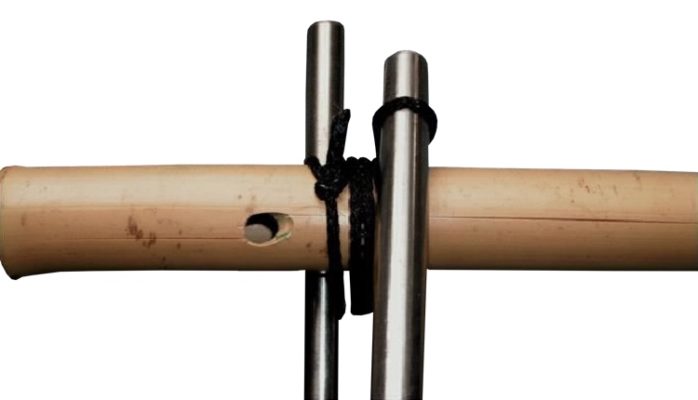
3. Now turn the second handle around the bamboo pole to tighten the rope, so the split is clamped firmly shut.
4. A second length of cord can be used to hold the tension on the handles if you’re working alone.
5. Now lashings can be added to the split area to keep the crack closed after the tool is removed. Long splits may need to be lashed in several places to close the entire split.
