- How big do you want to make your deck?For a deck with a dining table, 4 chairs, and a lounger, you should quickly consider a deck of 4 x 5 m (20 m²). Also decide in which direction you’ll install the decking boards (lengthwise or widthwise). For aesthetic reasons, decking boards are often laid parallel to the house, so a slope is often not taken into account. However, for an optimal lifespan of your decking boards, we recommend always allowing a 1–2% slope (1 cm of fall per metre).
- Where will you lay the deck?If you want to lay the deck on a flat surface, such as a roof terrace or balcony, you can use rubber tiles as a base (first check whether your roof or balcony can support the deck’s weight!). If you want to build a deck in the garden or over water, it’s important to create a stable substructure/foundation to which the decking boards can be attached. Consider, for example, hardwood foundation posts or adjustable pedestals.
- What tools and materials do you need?The tools and materials needed to build a deck depend on the surface. What you’ll definitely always need is: string line, tape measure, pencil, long spirit level, crosscut saw, cordless drill, decking boards, support beams, and decking clips. Depending on which substructure you’re building, you’ll also need the following tools and materials: shovel, rake, auger, ground screw, post-driving hammer, utility knife, ratchet, weed-control fabric, rubber tiles, concrete tiles, adjustable floor supports, stake posts, and carriage bolts.
CALCULATE MATERIALS
Imported bamboo decking boards have a standard size of 140 x 1850 mm. This means you need 4 boards per m². Don’t just account for the width (140 mm) of the decking boards, but also the gap between the boards (6 mm).

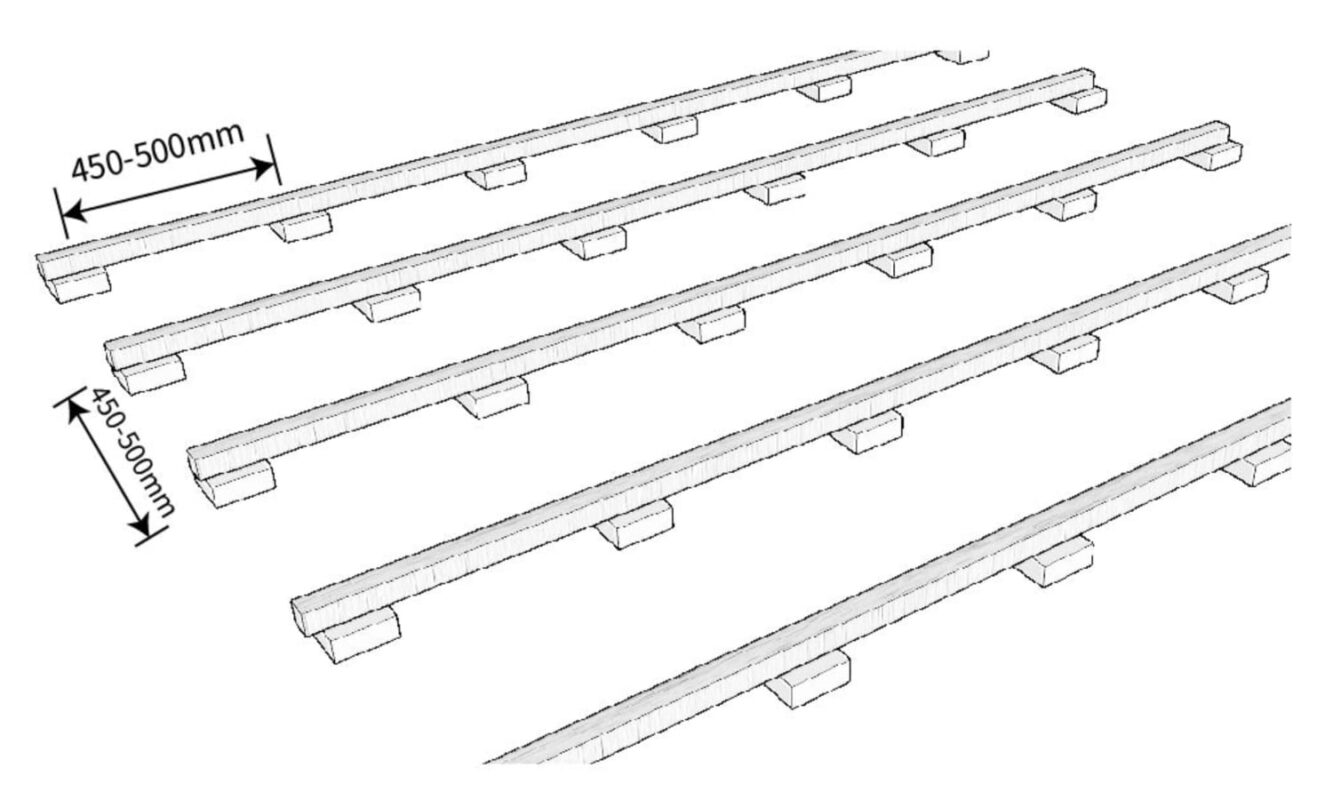
The distance between the beams must not exceed 50 cm (centre to centre). One decking board is therefore supported by 4 support beams. To calculate the exact number of beams and stake posts, we give an example below:
- Imagine you want to install a deck 500 cm long and 400 cm wide. To calculate the number of beams, divide the deck’s length by the beam spacing. In this example, 500 cm / 50 cm = 10 + 1 end beam = 11. Then multiply this 11 by the width of your deck in metres: 11 x 4 = 44 metres. So you need 44 linear metres of support beams for the whole deck.
- If you want to use stake posts as a foundation, you can calculate the number needed as follows: divide the deck’s length in cm by 50 cm, and the width by 50 cm. With a deck of 500 x 400 cm, you therefore need 500/50 = 10 stake posts for the length and 400/50 = 8 stake posts for the width. In this case, you need 10 x 8 = 80 posts for the whole deck.
Please note!The foundation is the basis of your deck — don’t cut corners here, and always stick to the recommended spacing.
Building a bamboo deck in 6 steps
Step 1: Setting Out and the Base
- Decide where you want to build the deck and stretch string lines so you know where the support beams should go. It can help to mark out the deck’s outline with small stake pegs. Remember that the support beams are placed perpendicular to, and underneath, the decking boards.
- Level the base with a shovel and a rake, and make sure the soil structure under the deck drains water well. For example, you can create a surface with layers of sand and gravel about 10 cm thick.
- We recommend keeping the deck at least 10 cm clear of the ground; this provides good ventilation space underneath the deck, so it dries quickly after a rain shower. If the deck is more than 50 cm above the ground, it’s not necessary to level the soil.
- Once the base for your bamboo decking is ready, you can move on to the layout lines. Mark the base to indicate where the stake posts, pedestals, or tiles should go. Note that the stake posts can be a maximum of 50 cm apart, both across and along the length of the decking boards. Dimensions are always measured centre to centre.
Step 2: Placing Stake Posts
* You can skip this step if you’re using tiles or adjustable pedestals.
- After setting out and marking the deck, it’s time to place the stake posts. Use a 7 cm auger to make holes for the 6 x 6 hardwood foundation posts, and drive the posts into the ground.
- Place the stake posts about 80 centimetres deep into the ground to prevent them from heaving in severe frost.
- Note that when you place the stake posts, the support beams are fitted with M8 carriage bolts ALONGSIDE the rows of posts, not ON TOP OF the post heads.
Step 3: Laying the Weed-Control Fabric
- To prevent weeds from growing between the decking boards, weed-control fabric is practically indispensable. If you’re not using stake posts, you can lay the fabric directly on levelled soil.
- If you’ve built a foundation with stake posts, lay the fabric over the posts and cut a cross at each post with a utility knife. Then you can easily push the fabric down over the stake posts.
- Make sure there is always an overlap of about 20 cm when applying the weed-control fabric. If needed, you can staple it all in place with a staple gun.
Step 4: Installing the Beams
- Now that the weed-control fabric is in place, you can mount the support beams. Use support beams with a minimum size of 40 x 60 mm. We recommend Azobé hardwood beams of 45 x 70 mm, preferably installed on edge, with the 70 mm side facing up. This gives less deflection than mounting them flat.
- The support beams can be attached in various ways, but always avoid direct contact with the ground. Use, for example, rubber/concrete tiles about 40–50 mm thick, or height-adjustable pedestals to support the beams. When attaching the beams to concrete tiles, it’s best to use connecting brackets or anchor bolts to fix them.
- When attaching to stake posts, the beams should be fixed to the side of the post, not on top of it. Mounting the support beams on the sides gives them more rigidity. Preferably use M8 x 120 mm carriage bolts for this. The ends of the wooden beams should not butt directly against each other — leave a gap of about 5–8 mm so the wood can move.
Important!For good drainage, it’s necessary to ensure a slope of about 1 cm per running metre along the length of the decking boards, so that rainwater doesn’t sit on the boards.
Step 5: Laying the Decking Boards

Our bamboo decking boards are very easy to install. Instead of having to screw through the decking boards, our bamboo boards have a recess so the special decking clips grip into the boards. This way, you can attach the boards with hidden fastening (screws are out of sight), which obviously looks much neater. What’s more, you automatically get the correct gap between the boards when installing the material, and the material can ‘work’ in case of weather changes.
Thanks to the good stability of the imported bamboo boards and the shape of the tongue/groove at the ends, there’s no need for a gap between the boards at the ends. The ends (tongue and groove) should be treated with oil or wax to prevent water penetration.


When using several lengths of decking board for your deck, it’s recommended to stagger the joints each time. For example, you can lay the deck in a stretcher-bond or random (wild) bond pattern. This gives a very attractive look and also provides extra stability. Cut deck sections must always be supported on at least 3 beams. Mount the ends of the decking board on the beams as much as possible. If a random bond pattern is desired, the distance between the beams must be a maximum of 300 mm (centre to centre).
Installing bamboo decking boards with decking clips:
- Decide which side of the board should face up (ribbed or smooth side).
- Start by laying the first decking board in one corner of the deck. Leave at least 2 cm of space between the deck and any walls or obstacles. This ensures good ventilation.
- Place the end clip in the groove of the decking board.
- Drill the hole for the screw. Always pre-drill hardwood beams with a drill diameter of 3.2 or 3.5 mm and a length of 8–11 cm.
- Turn the screw into the end clip and the beam without fully tightening it.
- Now place the next bamboo board, and use standard intermediate clips.
- Tighten the screw in the intermediate clip and the beams. Always drive the screw perpendicular to the beam. Always use the cordless drill at a low speed and low torque setting. Do a few tests to set the torque before starting the full installation. If necessary, use soft soap on the screws for smoother driving.
- Once you’re happy with the result, you can tighten the screws fully.

Installing bamboo decking boards with screws:
- Drill the screw hole on the left and right, 20 mm from the edges.
- Use stainless steel screws of about 5.5 x 50 mm.
Step 6: Finishing the Deck
- You can safely trim off the boards that stick out. Depending on the length and design of your deck, you can use this cut-off piece for the construction of the next row. As a final step, you can cut off any support beams that are too long, and finish the sides with an edging or fascia board.
- The cut ends should be treated with oil or wax to prevent water penetration.
- Now that the whole deck is installed and neatly finished, it’s a good idea to wipe down the bamboo deck to remove dust or sawdust.
- To prevent discolouration of the deck, it’s recommended to oil the bamboo decking twice a year. The best time to carry out the firstmaintenance treatment is 3–4 months after installation. With our Bamboo Shield oil, you make sure the deck keeps its beautiful colour. You can also prevent colour differences by regularly moving your garden furniture and/or storing it over winter.
There you go! Your bamboo deck is now ready for use. If you still have questions about our products or their installation and maintenance, don’t hesitate to contact us today.




 Deutsch